How to Soundproof a Music Room – Complete Guide
Do you need a soundproof room for music practice, playing drums or as a recording studio?

DIY Soundproof Room for Music
Soundproofing is one of the biggest hurdles for any dedicated musician who needs a room for music practice, or needs a recording studio for drums and other loud instruments.
If you live on a remote island, then congratulations, you can make music at all hours. But for the rest of us, living in apartments, houses and dorm rooms poses a unique set of challenges.
Fortunately there are some great solutions when you know which soundproofing materials to use. Most of the techniques I’ll show you here are quite simple – suitable for anyone with basic DIY skills.
Index:
Let’s start with a simple lesson on sound…
How sound works
Sound is energy.
You can’t actually destroy this energy. But you can encourage it to turn into heat, or to disperse.
The energy moves in waves, called sound waves, which pass through air, as well as solid objects and liquids.
And when a sound wave hits an object, like a wall, it causes the wall to vibrate. Those vibrations create new sound waves, so the sound continues beyond the wall.
And the solution?
Stop the wall from vibrating.
You do this by weighing the wall down and adding mass.
Creating an air gap to stop sound
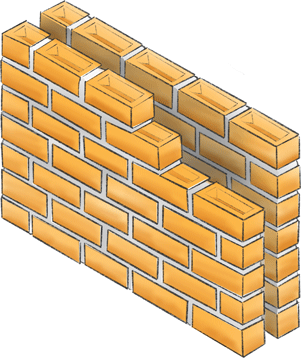
After your wall (or floor or ceiling) has reached a certain mass, it becomes more effective to have two walls, with an air gap.
Just a few inches of air makes a big difference.
But a bigger gap is better for stopping sound waves.
To see this in action, take a look at double glazed windows. They’re made up of 2 sheets of glass, with a small air gap between them. This is a tiny air gap, so less effective on lower frequencies, which have the largest sound waves.
Stopping the bass from travelling
Low frequency sound is the hardest sound to keep in or out of your music room. Think about the rumble of traffic once you’ve closed the window. Or the bass from the other end of the street at that 3am party.
It’s the same for your lowest instruments – bass guitar, piano, kick drums. They all produce big long sound waves which can be problematic to contain.
The solution? The lower the sound you need to isolate, the more soundproofing you’ll need. It’s easy to soundproof high frequencies, like a flute or violin, but difficult to soundproof the sub bass from your studio monitors.
First step – assess the room
The first thing to do is find the best part of the apartment or house to set up your music room.
Choose a room which has the least adjoining rooms, and is furthest from the street. This will cut out traffic noise and your closest neighbours. Don’t forget about downstairs and upstairs neighbours too – walls and ceilings can be quite thin.
The bigger the room, the more effective for handling sound waves from large, bass heavy instruments, which produce long sound waves. There’ll also have to be space for acoustic treatment inside the room, for the best sound quality.
Once you’ve chosen the ideal room for music, your job is to make it as airtight as possible. It only takes a small gap in your soundproofing to undo all of your hard work.
Listen to see where sounds are coming from. Can you hear people talking next door? The sound of a TV from downstairs? Look out for ducts, which can carry sound in and out. And listen carefully for noises from pipes or AC units.
You’ll probably notice that most of the sound is coming in from the doors and the windows. These are the weakest soundproofing links in the structure of any building.
Remember, sound proofing is different from acoustic treatment. Sound proofing stops sound waves entering and exiting the room, keeping noise levels down. Acoustic treatment is optimising the sound quality within the room.

How to soundproof a window in your music room
Windows are the obvious culprits for sound leakage, and the first place you should address for soundproofing a room for music. If you live in an older house, the windows might be rattly, so look closely – you may well discover lots of little air gaps.
Your job is to seal all of these gaps. It’s simple – get yourself some caulk (pronounced cork), and fill all the gaps you can see in the window frame. Caulk is commonly available in white, but you can choose a colour that matches the frame. It comes out wet from the tube, and will be dry by the next day for painting if desired.
Also, take a look at the panes of glass, and how they meet the window frame. If you see any gaps, use a clear sealant.
Double glazing for soundproofing
If you own your own house or apartment, you can look into upgrading the windows to double glazing. Double panel windows are far more effective at reducing sound than single panels. They also tend to have better seals for creating that airtight (think sound-tight) environment.
If you already have double glazing, check for air gaps in the window and in the frame. Fill with acoustical caulk where you can, but if the windows are old, the seals may be expired and need replacing.
If you rent your house or apartment, or want to keep your double glazed windows as they are, there is a solution. Some companies make bespoke glass panels (called inserts) which you can attach. They’ll provide an extra valuable layer of soundproofing.
Double double glazing
Home owners – if you really want to go to town on soundproofing, don’t just install one double glazing window – install two, side by side.
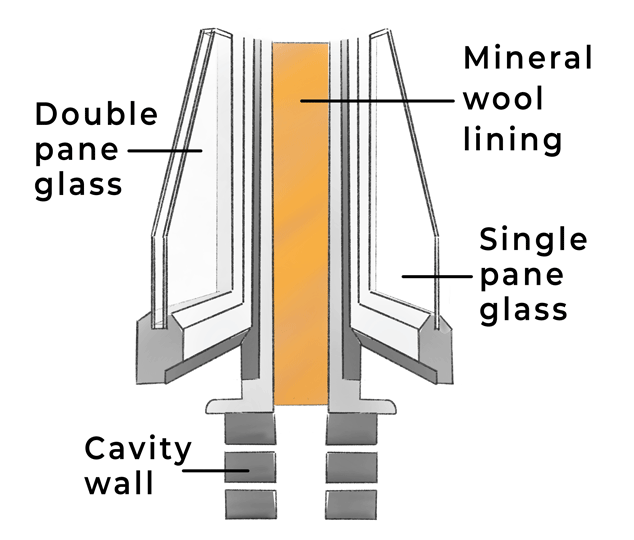
Fit the double glazed unit flush with the outside wall, and fit a single panel window flush with the internal wall. That way there’ll be an air gap between them, the thickness of the wall.
You can line the air gap surfaces with some sound deadening material like acoustic foam or mineral wool.
Soundproofing by blocking up a window
If you have no need for natural light in your music room, or you don’t mind sacrificing natural light, blocking up a window is the ultimate soundproofing solution. It essentially eliminates the window, and with it, any chance of sound coming in or out.
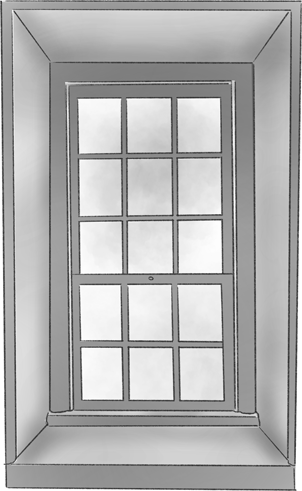
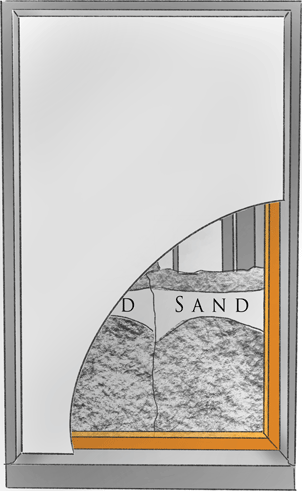
Your window should look something like this to start with. You’ll be building a simple wooden frame inside and blocking it off with drywall.
The void inside will be full of heavy, sound deadening material.
- 1) Install a baton frame
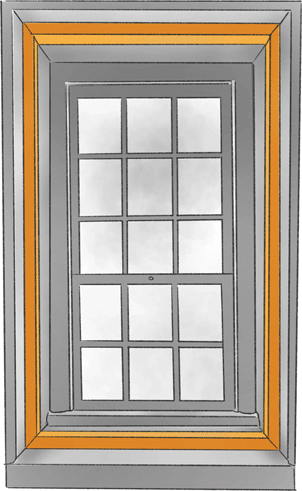
Screw a wooden 1 x 1 inch frame into the window recess.
Set it back at least 1 1/4″ from the wall surface.
This is so you can attach drywall without protruding past the window recess.
- 2) Fill the window recess

Use mineral wool slab to fill the space between the baton frame and window. Don’t compress it, as that will change the density, and interfere with sound absorption.
If there’s enough room, you could fill the void with bags of sand instead. This will be even more effective than mineral wool.
- Attach drywall to frame

How to soundproof a door in your music room
The internal doors in most homes are incredibly lightweight. They tend to be either hollow or made from very thin wood panels. Doors also tend to have gaps around their edges, where they meet the door frame. Take a close look at your doors – you might be surprised!
There’s often a sizeable gap at the bottom of the door too. This is like having the door permanently ajar, even when it’s fully closed. Soundproofing a door can really do a lot to stop unwanted sound travel.
Making an airtight seal for soundproofing
The first thing to look at are the gaps between the door and the door frame. Study this area carefully to see how well the door actually fits the frame.
In a door frame, there’s a smaller wooden internal frame called a door-stop. It’s easy to stick a self-adhesive rubber gasket directly onto the doorstop. This rubber seal compresses, and forms an airtight seal when the door is closed.
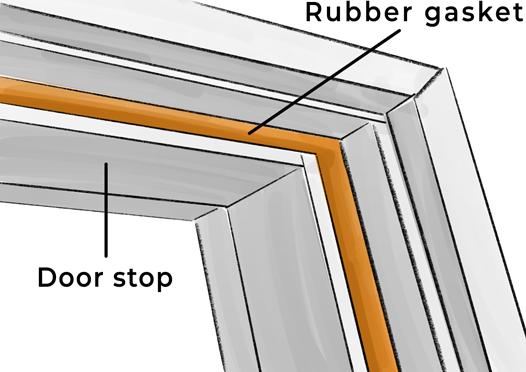
You can get these rubber seals in different thicknesses, so try to get an idea of how big the gaps are.
You might even need 2 sizes to match the different gaps around various areas of the door frame.
The gap at the bottom of the door
This will still leave a gap at the bottom of the door allowing sound to pass through. The simple solution to this is to continue the door stop, so it sits on the floor at the door threshold. Use a piece of wood, the same thickness as the rest of the frame, and cut it to the correct width. You’ll have to screw this directly into the floor.
This will provide a continuous seal around the door and the frame. The only potential problem is that little piece of wood to step over, every time you go through the door.
There is another more elegant solution to closing the gap underneath the door. And that’s fitting an ‘automatic door bottom‘. It’s a small metal mechanism, which seals the door with a rubber stop every time it closes.
Don’t be tempted to fit a plastic or brush door sweep. Door sweeps might help with drafts, but they’re too lightweight to have any effect on sound control.
Fitting a heavy door for soundproofing a music room
It’s much harder for sound to pass through heavy materials, and a door is no exception. There’s two ways to go about this – uprating the door you have, or buying and fitting a new one.
Soundproofing a door
You can increase the mass of the existing door by adding extra layers. The more layers, the better, and it’s best to mix materials up. Try a layer of mass loaded vinyl stapled and glued to the door, followed by a layer of MDF. You can then add another layer of plywood for a nice wooden finish which you can varnish or paint.
Remember that adding all of these layers to increase mass makes the door much heavier. You might have to upgrade the hinges too, to make sure they can carry the new weight of the door.
Buying a new soundproof door
If you want to buy a new door for your music room, look for a fire rated door, as they’re heavier, and more dense than the standard ones.
There’s also the option of buying a professional acoustic door – this will be the most effective, but also the most expensive. It will probably have a compression latch, which pulls the door closed into a tight seal.
Two doors for soundproofing a music room
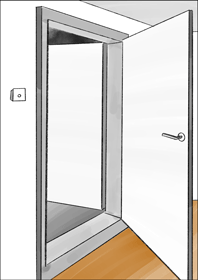
If you want the best chances for fully soundproofing your room for music, it’s even better to fit two doors. One will open into the room, and the other out of the room. This will create that all important air gap between both doors.
Commercial studios use two doors, with both doors fully sealed. Sometimes the gap between doors in commercial studios is so big that the space doubles as a storage area for cables.
Soundproofing curtains for a music room
Heavy curtains can absorb a small amount of the sound in the music room. But it will only have a minimal effect on the sound coming in or out of the room. It achieves this by reducing the sound inside the room. Every little helps, but don’t expect it to have any effect on lower frequencies.
Absorbent materials like curtains have more effect on the acoustic treatment of a room. Acoustic treatment is the quality of sound within a room.
The Room within a room
Once the doors and walls have been treated, you can turn your attention towards the walls, floors and ceilings. They can all be treated on their own to address weak areas, or you can combine them to effectively build a new room within the room. I’ll give you an overview here, but you can look at the individual sections for detailed construction details:
Firstly, the soundproof floor is made, which is acoustically separated (decoupled) from the existing floor. There’s different methods of making the floor. A popular flooring method for the room within a room is to use timber batons laid in a grid. On the underside of each baton is a thick layer of neoprene rubber, to isolate it from the floor.
Next, the walls and a ceiling are added, leaving an air gap all around. None of this section makes contact with the existing room. There’s normally no windows in a room-within-a-room. And there’s two separate doors – one for the existing room and one the internal room.
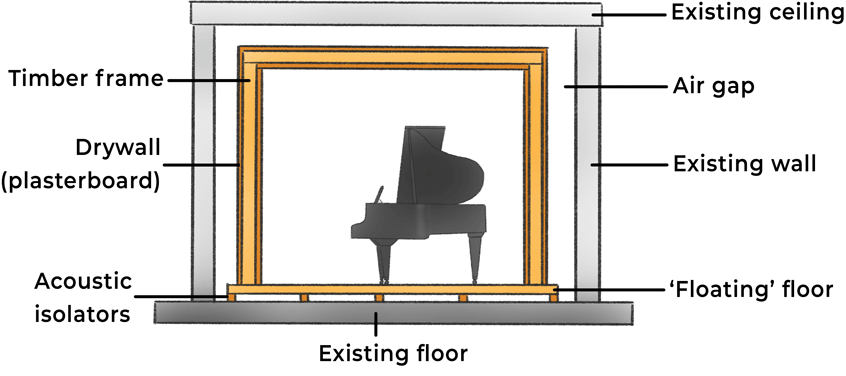
An airtight room within a room will also need an air supply. Air can be fed through a home made baffling system to reduce any fan noise at the source.
The room within a room technique is used by commercial recording studios to soundproof to a high degree. It’s probably overkill for most home studios. Try working on specific problem areas, such as the one wall with noisy neighbours on the other side.
There’s also a much simpler way of building a room within a room – buying a sound booth.
Using a Sound Booth in your music room
If you don’t have the budget or space for a room with a room, and you need that acoustic isolation, you should consider a sound booth.
A sound booth is a small room you can build from a kit. They’re available in different materials, some using two layers, with an air gap between them.

Sound booths are normally used for recording vocals, voiceovers or solo instruments.
I once had a whole recording studio set up in a 4 x 4 metre metal booth. It included a grand piano and a sofa, and allowed me to practice and record at all hours without disturbing anyone.
Booths can get very hot, especially if there are a few people inside. Most of them have quiet fans to bring air in from outside. But these can be too noisy in practice. Some booth users open the door in between takes instead.
The advantages of sound booths are that they can easily be dismantled and taken to another premises if needed. I eventually sold mine to a sound engineer setting up a recording studio in another part of the UK.

How to soundproof walls in your music room
The external walls of a house are normally made of 2 layers of brick, with an air gap between them. These walls are solid and heavy – they have great sound proofing properties.
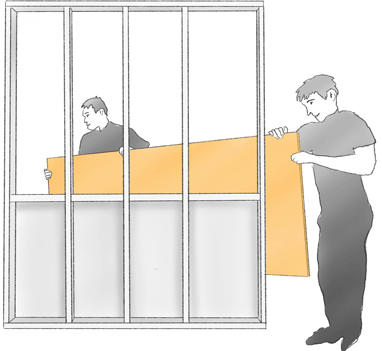
But internal walls are quite different. They’re normally made from large sheets of drywall attached to both sides of a wooden frame.
They’re much lighter than external walls, and typically don’t provide much of a sound barrier.
Soundproofing the walls of your music room
To soundproof a wall, you’ll need to achieve two things:
- Add mass
Adding mass and weight helps to stop the wall from vibrating. The less the wall vibrates, the less sound will pass through. The easiest way to add mass is by adding more layers of drywall.
You can increase the soundproofing even more by adding a heavy sound deadening material called barrier mat, or mass loaded vinyl.
- Stop both sides of the wall from touching each other
This is a concept called ‘decoupling’. An extra wall is built next to the existing one, but it doesn’t touch it. This helps to limit vibrations passing from one wall to the other. It’s best achieved with an air gap, the bigger the better. But where space is tight, you can use isolating materials, such as resilient channels, which stop vibrations passing through.
Resilient channels for soundproofing a wall
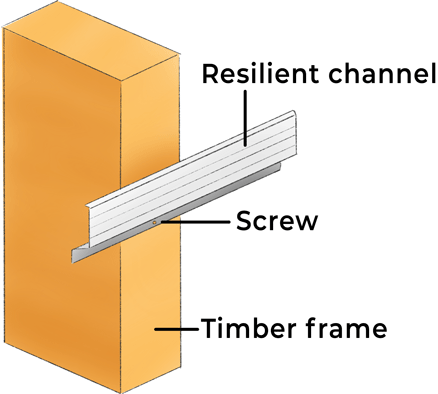
Resilient channels (or resilient bars) are thin metal strips which absorb vibrations. They’re used as an isolating layer between the wooden studs of the wall frame, and the drywall.
Resilient channels are easy to fit, with one screw per upright stud.
They’re also very effective for ceilings, or wherever there’s a timber frame to attach them to.
Instructions for soundproofing a wall
If you need to soundproof your room for music, and you’ve identified the walls, or a specific wall as being problematic, follow this guide to reduce any noise transmission.
- Take one side of the drywall off
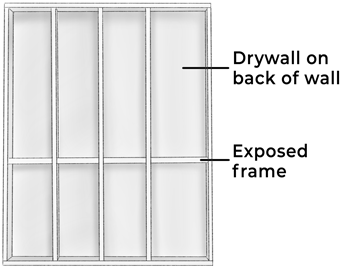
Break off the drywall on the side of the wall you want to soundproof.
This will expose the wooden frame, the drywall on the other side, and any electrical wires for plug sockets or lights.
- Fill the voids with mineral wool
To find the right thickness of mineral wool slab, measure the depth of the cavity. It’s generally available in sizes between 1 inch (25mm) and around 5 inches (127mm)
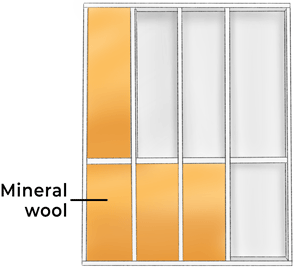
Cut the mineral wool slabs to fit snugly between the wall studs with a wood saw.
Make sure not to compress them, as that will change their sound absorbing capabilities. It’s best to wear gloves while you do this, as mineral wool can irritate your skin.
- Add resilient channels
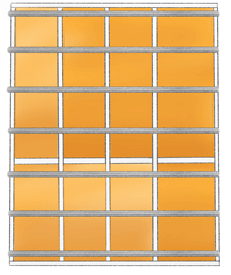
Screw resilient channels to the studs (vertical timbers) of the frame.
Fix them horizontally, and space them around 24” apart.
Position the channels with the raised section (flange) at the top.
- Add acoustic drywall
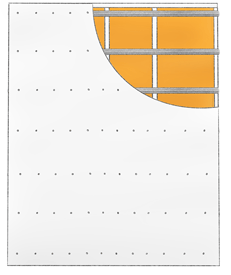
Position sheets of acoustic drywall vertically against the resilient channels. Screw them directly into the channel flanges, spacing each screw around 12” apart.
Make sure to avoid screwing directly into the studs.
Leave a tiny gap at the top and bottom of the drywall, and seal it with acoustic sealant. This stops vibrations from the wall transferring to the floor and ceiling.
Look for any gaps where the drywall meets other walls, and seal those too.
- Add more layers to increase mass
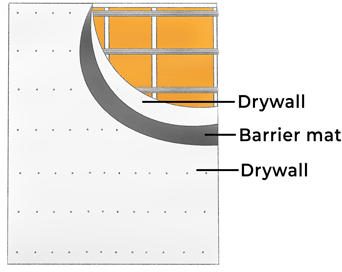
You can add more mass to the wall by adding extra layers of acoustic plasterboard. 2 or 3 layers are quite standard for effective soundproofing.
Make sure to stagger the joints. as you put up each layer of drywall.
For even more mass, you can sandwich a layer of mass loaded vinyl between two drywall layers. Sound waves really struggle with this variety of materials and thicknesses. And for added isolation, glue all the layers together with green glue, an effective damping compound.
Mineral wool vs fiberglass for sound isolation
Mineral wool is made from volcanic rock fibers, and is denser and heavier than fiberglass. It’s more efficient in absorbing sound and also has a higher thermal performance. The only time you’d use fiberglass over mineral wool for sound insulation is if you needed to keep weight to a minimum.
Making a double wall for soundproofing
If you need to make a whole new soundproof wall for your music room, it’s best to use double thickness brick or blockwork. But remember bricks are heavy – only do this if your existing floor is strong enough to take that sort of weight.
If you want to ensure the best results, it’s best to build another wall in front of the existing one. You can use the same standard partition wall method – wooden frames and drywall.
Whereas a standard wall has one wooden frame, a double wall has two separate frames, with an air gap. The bigger the gap, the better the isolation.
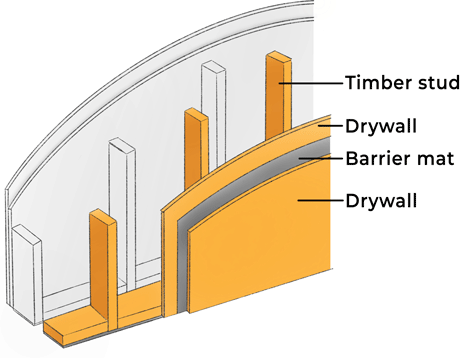
Mount each wooden frame on a strip of neoprene rubber. This will isolate the wall from the floor.
You can fill the gap with mineral wool, or any sound absorbing material. Finish the wall with extra layers of acoustic plasterboard and barrier mat.
Soundproofing electrical sockets
While soundproofing a wall, you may need to reposition some of the electrical boxes. Use a qualified electrician to carry out this work as there’s potential risk.
The sockets can be positioned flush with the finished outside wall once the plasterboard layers have been affixed. Seal around the boxes with acousitcal caulk, making sure there are no holes to let sound through.
A more thorough solution for soundproofing, is to mount the electrical boxes on the outside of the wall. This means you only have to make small holes in the drywall, for the wires to pass through.

How to soundproof a music room floor
The floor transmits sounds from two sources:
- the air
This is called airborne sound, and includes instruments, voices and singing
- objects in direct contact
This is called impact sound, and could be anything from high heels to guitar amplifiers. These heavy objects send vibrations directly through the structure of the floor. From there, they pass into the fabric of the building.
Both airborne sound and impact sound need to be addressed with soundproofing a floor.
But before you start, you’ll need to know the sort of floor construction you have – wooden or concrete.
Soundproofing wooden floors
Older homes often have floorboards nailed to a wooden structure. The floorboards are either left bare or covered in hardboard and carpet. This type of floor can be tricky to soundproof – wooden structures are lightweight, and there’s gaps between the floorboards.
The quick and easy soundproofing solution for floors
The easiest way to stop noise through a wooden floor is to install a thick acoustic underlay under the carpet. It’s the cheapest solution and can even be carried out in rented accommodation. This method helps with both impact and airborne sound.
If you have your own home though, you can do a more thorough job…
Instructions for soundproofing a music room floor
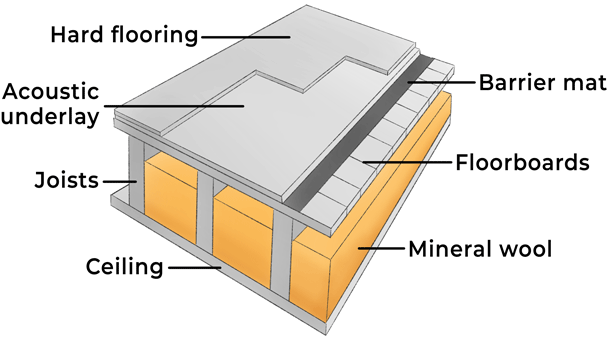
- Take up the floorboards
Carefully prize up enough floorboards to access the voids underneath. Number each board you remove, so you can replace them in the right order.
You might have chipboard panels or another material instead of floorboards. Take them up and order them in the same way.
- Fill the cavities with mineral wool
You should now see the exposed timber joists laid in a criss cross pattern. Underneath that will be the drywall ceiling of the room below. Cut mineral wool slabs to fit the rectangular voids, and allow them to rest on the drywall.
Mineral wool is available in thicknesses between 1 inch (25mm) and around 5 inches (127mm). Alternatively, you could use fibreglass insulation, which is less structured.
- Replace the floorboards
Once the boards are back on, check for squeaks, and screw them down where necessary.
- Install barrier mat
Soundproofing barrier mat is a very heavy rubber or vinyl membrane. It’s also called mass loaded vinyl. It’s just a few millimetres thick and can weigh up to 10kg per square metre.
It can be laid loose across the floor, with each piece butted up against each other. The mat blocks all the gaps, and adds some weight to the floor. It can also be nailed in place, or glued for even more sound efficiency.
- Install floating floor
Now all the gaps have been addressed, you can install a floating floor. The first layer of this is a rubber acoustic underlay. This is placed without fixing down, all joins abutting each other.
- Install hard floor
The final layer can be a tongue and groove flooring of your choice. It could be solid timber, engineered wood or an acoustic chipboard. Make sure to leave a gap around the edges, so the floor doesn’t make contact with the walls.
You can also work on the ceiling underneath the floor for extra sound protection.
Soundproofing concrete floors
Concrete floors tend to be really good for stopping airborne sound, but they can suffer from impact noise. The answer to this is installing a floating floor.
The quick solution
The easiest method is to install a simple floating floor. Lay down an acoustic underlay, and cover with a hard floor, as above.
The thorough floor soundproofing solution
An effective method is to use 2 x 1 inch wooden batons, and 2 inch wide, self adhesive neoprene rubber. Stick the neoprene onto one side of the batons, and lay them in rows, rubber side down.
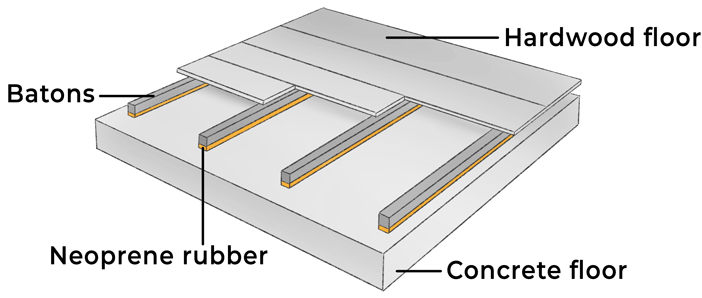
Screw a layer of acoustic chipboard directly onto the batons, gluing the seams, and screwing directly onto the batons. Make sure not to screw directly into the floor beneath. You can add a finishing layer of solid wood or laminate, glued and screwed onto the chipboard.
This is how my current apartment is soundproofed. It’s a converted factory with concrete floors, and has incredible soundproofing.
Floating platforms for soundproofing
If you have drums, subwoofers, amplifiers or a piano on the floor, they’ll transfer vibrations directly into the floor and building. This will cause a huge amount of impact noise.
But you don’t necessarily have to soundproof the whole floor to address this. There’s an easier solution – an isolation platform. You can buy these, or make one yourself quite easily in a day.
How to make a soundproof isolation platform
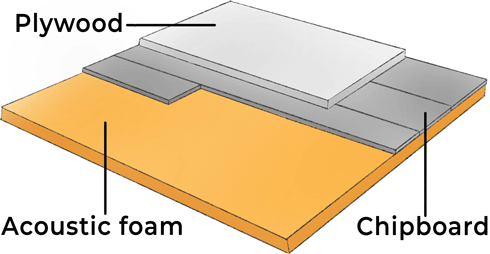
Decide how big you need the platform to be. 6 x 8 foot is probably the minimum for a drum kit, though its best to make it slightly bigger if you have the space.
I once made a large one of these for an apartment I was living in for an upright piano. Instead of mineral wool, I used special acoustic feet, as the piano and player weighed in at around 350 kg.
Making an isolation platform
- Lay isolation layer
The first layer can either be 1 inch (25mm) acoustic foam, or mineral wool slab.
- Lay chipboard and plywood
Lay a layer of tongue and groove chipboard on top of the mineral wool, glueing the seams together. Then add a layer of plywood, at least 5/8 inch (or 15mm). Cover the joins of the chipboard with the plywood wherever possible. Glue and screw them together
- Add carpet or rug
This is entirely optional, depending on the type of acoustic you need. A rug can easily be removed if you need a more reflective surface to record an acoustic guitar.
Isolation pads for soundproofing
For studio monitors on stands or on a desk, you can use neoprene isolation pads. They’re the size of a speaker footprint, and will decouple the speakers from the surface they’re sitting on. They’ll also help contain the bass response, giving you a more accurate listening experience.

How to soundproof a music room ceiling
Ceilings are best treated by adding a second ceiling, suspended below the original. The bigger the air gap between these two ceilings, the more effective the soundproofing.
Working overhead can be difficult and dangerous, so best to hire a contractor to do this work for you. Treating the ceiling always means loosing a bit of head height. I’ll describe 5 methods, starting with the most space saving, and ending with the most acoustically efficient.
#1 Add mass to the ceiling (takes up 3/4″)
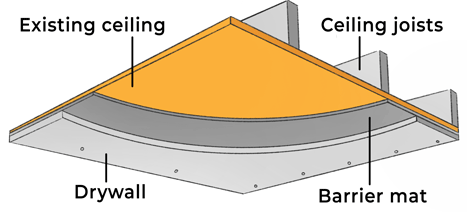
This is a method for beefing up the existing ceiling. The heavier it is, the less the ceiling will vibrate, and the less sound will pass through.
- Glue a layer of barrier mat directly onto 5/8″ (or 15mm) sheets of acoustic drywall (plasterboard).
- Find where the hidden joists are in the ceiling and mark them out.
- Screw the drywall onto the joists, barrier mat side up.
This is also good for old-style lathe and plaster ceilings, which have good acoustic properties, but are prone to crumbling.
#2 Replace the existing ceiling (takes up 1 3/8″)
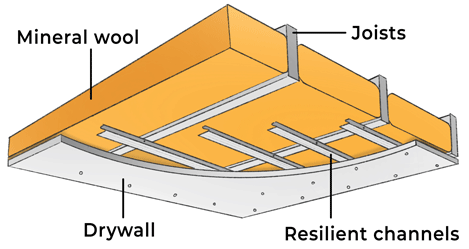
Remove the existing plaster, so you’re left with the exposed timber joists.
Screw on resilient bars perpendicular to the joists every 16 inches (or 40cm).
Fill the gaps between the joists with 4 inch (or 100mm) mineral wool slabs. The resilient channels should stop them from falling.
Screw 5/8 inch (or 15mm) acoustic drywall (plasterboard) onto the resilient channels, watching that you don’t screw into the joists as well.
#3 Shallow suspended ceiling (takes up 4″)
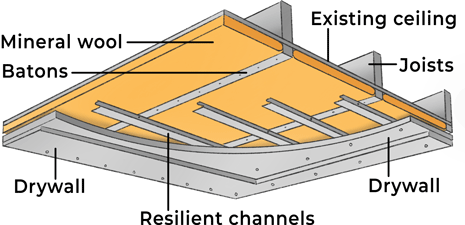
Locate the positions of the joists behind the existing drywall (plasterboard). Mark them directly onto the ceiling, and also at the tops of the walls.
- Fix 2 x 2 inch batons onto the ceiling, screwing into the joists.
- Glue 2 inch (or 50mm) thick mineral wool slabs onto the ceiling, between the batons.
- Screw on resilient channels perpendicular to the batons, every 16 inches (or 400mm)
- Screw 5/8 inch (or 15mm) acoustic drywall (plasterboard) onto the channels.
- Glue and screw a second layer of 5/8 inch acoustic drywall onto the first. Stagger the joints.
Independent suspended ceilings
If you have enough headroom, you can create a large gap between both ceilings. The larger the gap, the better the soundproofing.
There’s two variations – with metal frame, and with wooden joists. Both of these should be made by builders or very experienced DIYers.
#4 Metal frame
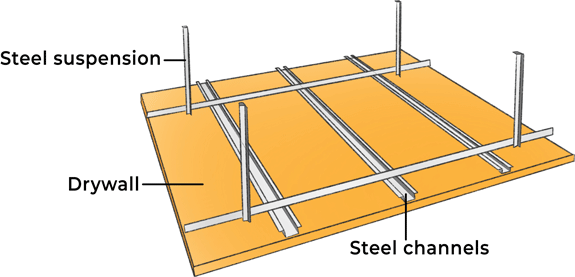
In this system, a lightweight metal frame is suspended from the ceiling. It’s attached with height adjustable, metal strips.
Once the frame is in place, mineral wool is fed through to loosely fill the cavity.
2 layers of 5/8″ (or 15mm) acoustic drywall (plasterboard) are screwed directly onto the metal frames.
#5 Independent joists (takes up 13″ or more)

In this method, an extra set of joists are fixed to the walls with wall hangers.
Make sure the joists are thick enough to support 2 layers of acoustic drywall. Position them so that there’s around 12 inches (or 300mm) gap between the underside of the joist and the existing ceiling.
Each joist sits on a neoprene pad within the hanger, to stop acoustic transmission.
Resilient channels are attached, perpendicular to the joists, every 16 inches (or 400mm).
Mineral wool slab is fed through into the cavity.
2 layers of 5/8″ (or 15mm) acoustic drywall (plasterboard) are screwed into the channels.
Soundproofing myths
Most soundproofing myths arise from a confusion between:
Soundproofing – stopping sound entering and leaving the room, and
Acoustic treatment – improving the sound quality within a room.
#1 Moving a bookcase or dresser against a wall
This will have zero effect on soundproofing. The closest thing to this that might have a slight effect, is installing a heavy fitted bookcase directly onto the wall, as it will add mass and weight.
#2 Hanging sound absorbers or acoustic foam
Sound absorbers are for acoustic treatment – the sound quality in the room.
They only have a minimal effect on soundproofing, which is stopping sound entering and leaving the room.
#3 Soundproofing curtains
While these can have a small soundproofing effect for doors and windows, they are nowhere as effective as the methods described above.
They should be used for acoustic treatment instead.
#4 Soundproofing wallpaper and soundproof paint
Because so called soundproof paint and wallpaper lack mass, they will not help with soundproofing.
#5 Egg box cartons
Egg boxes may have a slight effect on room acoustics, but will have no affect on soundproofing.
#6 Carpet, rugs or blankets on the wall
These soft furnishings will help reduce reverberation in a room. But they won’t have a noticeable effect on stopping sound entering or leaving.
Conclusion
There’s many low cost DIY solutions to soundproofing a room for music. But to treat very loud instruments such as a drum kit or piano, can involve considerable and effort.
There’s normally some sort of compromise involved between soundproofing and making less noise. What can you can do about stopping those sounds at the source?
Can you listen to your mixes at lower levels? Record instruments during the day when the neighbours are at work? Or use electronic piano and drums instead of acoustic?
Try making your loudest sounds during the day, when the ambient noise level is high. And record those delicate vocals in the evening, when most people are asleep.
If its your neighbours making the noise, see if you can come to an arrangement, where they keep quiet at certain times.
Don’t worry if you can’t achieve your full soundproofing goals. Even top recording studios have to compromise to a degree. Learn to work within your limits and your creativity will flourish.
As well as soundproofing, make sure to optimise the sound quality of your studio for quality recordings.
Education is the key to getting a pro sound. I’ve made a guide to help you choose the Best Online Music Production Courses available right now
Author: Daren B

Daren studied classical piano and composition at Trinity College of Music, at undergraduate and postgraduate level.
His music has been performed at the Southbank Centre, Tate Modern, and the Courtauld Institute, and broadcast on BBC Radio 3, Radio 4 and countless TV shows, including The Apprentice, Top Gear and Horizon.
Daren is a former lecturer on the BA Music Course at Goldsmiths College, University of London. He currently works in London as a composer and psychotherapist.
